
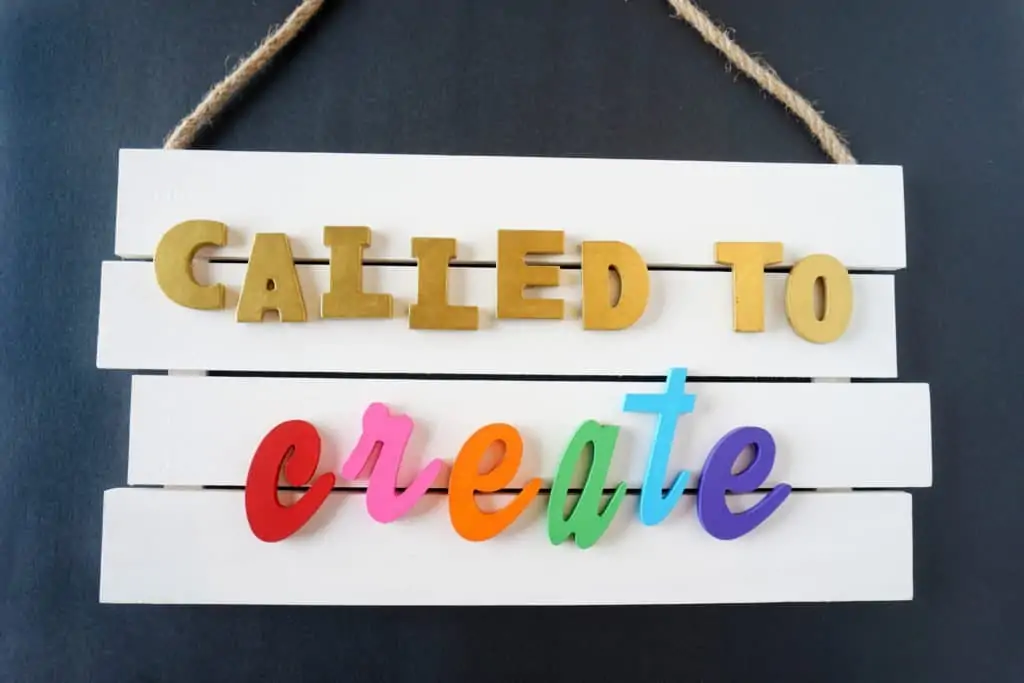
What purpose or career has God called you to? This fun “called to create” sign can be customized to say whatever you like, as a reminder that God has a special purpose for you.

{ This post and the photos within it contain affiliate links. If you make a purchase after clicking an affiliate link, my ministry gets a small commission, with no extra cost to you. See my full disclosures HERE. }
A long time ago (probably over a year!), I discovered this very cool tutorial for a “Be Creative” sign, that I knew I wanted to try. I thought, this would be so cool to display above my craft desk! But, you know how it goes…
…I bookmarked the page, thinking I’d go back to it. Aaannnd…life happened, and like so many other great ideas, it fell by the wayside. Until, a series of divine coincidences caused me to follow through and make the sign!
Friends, I don’t always know for certain which details of life are ordained by God, or which things He expressly wanted to happen. But, this string of events led me to think, maybe God wanted me to make this creative sign and share the tutorial with you?
First, there was the double flat tire incident. I won’t go into specifics, but two flat tires on two of our family cars, in one evening, caused me to end up needing a ride to work the next day. And due to an appointment they couldn’t miss, my parents weren’t able to pick me up until a couple hours after my shift ended.
So, what’s a girl to do with herself, when she’s stranded like that? Walk down to the Hobby Lobby that’s just across the parking lot, of course! 😉 Never mind that I didn’t have any specific purchases in mind; there’s always enough possibility in a craft store to keep me busy just browsing.
I found myself walking down the aisle where they had unfinished wood signs, and then it hit me: The “Be Creative” sign! I should make it! And, ooh!!! An idea hit me! Why not have it say “Called to create”? YES!!! Even better. So, I gathered up the supplies. But, I didn’t have time to actually make it for a few more weeks, until…
My Macbook Pro, which I depend on heavily for both personal and business/blog/design stuff, had a swelling battery. So, you can imagine how shell-shocked I was, when the tech at the Apple store informed me they’d have to ship it off to be repaired, and then ship it back to me, all of which would take about five days. Wait, FIVE DAYS???! What???
It’s okay though! Being without my precious laptop/essential tool for life, and thus being unable to do anything computer-wise, gave me time to paint. 😀
So, all of that to say, maybe God wanted me to get this “Called to Create” sign finished, so I could share the idea with you, in case you too want to make something similar for your home or office.
How to Make Your Own “Called to Create” Sign
The original “be CREATIVE” sign idea came from Carissa at Creative Green Living. But, like I said before, I decided to make mine say “CALLED TO create”. I fully believe God has called me to create, for His glory and for the good of others. So I wanted something that would remind me of that!
My sign looks a bit different from Carissa’s, in that I used all caps letters for the first part, and lowercase script letters for the bottom “create” part (whereas hers is the other way around). When I was experimenting with the different letter options at Hobby Lobby, those are the ones that fit best, since I needed letters small enough to fit “CALLED TO” across the top. And, I think it ended up looking so cute to have the word “create” in playful script letters!


Supplies
To re-create this for yourself, you will need:
- A pallet sign of your choosing. Mine is an unfinished sign from Hobby Lobby which measures 10″ tall x 18 1/2″ wide, but you can find ones that come pre-finished if you prefer, like this one from Amazon.
- Wood letters (I used 2″ tall block letters for the words “CALLED TO”, and 2 5/8″ tall script letters for the word “create”)
- PAINT COLORS: Some of the paints I used are ones I already had on hand, but most of them are FolkArt matte acrylic paints, and some I purchased specifically for this project.
- White: FolkArt ‘Titanium White’
- Gold: FolkArt ‘Metallic Pure Gold’
- Red: I used an old bottle of Apple Barrel ‘Cardinal Crimson’ red paint, which I’ve probably had for 10+ years! But FolkArt ‘Apple Red’ would be a pretty close match.
- Pink: FolkArt ‘Bright Pink’
- Orange: FolkArt ‘Pure Orange’
- Green: I mixed half-and-half of an old bottle of Apple Barrel Meadow Green, with FolkArt ‘Bright Green’.
- Blue: FolkArt ‘Ocean Cruise’
- Purple: FolkArt ‘Perfect Purple’
- Acrylic paintbrushes (use small/medium flat brushes for the letters, and large brushes for whitewashing the pallet sign)
- Ruler or yard stick
- High-temp hot glue gun
Choosing the Colors
As you can see in the pic below, I experimented with several different variations of colors, before settling on the six colors I would use for the letters in “c-r-e-a-t-e”. I have SO MANY paints I’ve collected over the years, but still, I ended up purchasing two new colors (Bright Pink, and Perfect Purple) in order to achieve the bright color palette I wanted.

To test the colors, I just put a dot of color on my fingertip, and smudged it onto the paper. You can see the final palette, on the right.
No need to dirty up paintbrushes just for testing! 😉
The Painting Process
Depending on how your pallet board and letters came, you might need to paint them white first. Of course, you could choose to do something different with your pallet sign, like staining it instead of painting. But for the letters, it really helps to have a white backdrop for the colors to stand out. Think of it like painting the walls of your home: You use primer first (especially if your existing wall color is very dark), and then paint with the actual color.
Since my pallet sign was unfinished, I white-washed it with a 50/50 mix of the FolkArt Titanium White + water. Two coats did the job nicely.
The letters I purchased for “CALLED TO” were already white, so I just had to paint them gold. However, I was surprised that it took four coats of gold paint to get solid coverage, with no hints of white showing.
The script letters for “create” required two coats of white paint first, followed by 2.5 coats of color. I say two-and-a-half, because I first gave them two coats each on the front and sides of each letter. But then, I still wasn’t quite happy with the coverage, so I added one more coat on just the front of each letter.
Attaching the Letters to the Sign
Depending on the look you’re going for, you might want to use a ruler or yard stick for aligning/spacing your letters before gluing them down, as Carissa did in her tutorial. But for my “CALLED TO create” sign, I wanted a bouncier, more playful look, so I mostly just ‘eyeballed’ it.
Place your pallet sign on the floor, and arrange the letters to your liking. Then, you can stand up and look down on it, to see if your spacing is good. You’ll want to get a feel for how it will look from a few feet away, when it’s hanging on your wall.
Once you have everything placed where you want it, use a pencil to mark where each letter should go. Just one little dot underneath the top and bottom edges of the letter will do. Don’t mark outside where the letter will be—you want your pencil dot to be underneath the edge, so the letter will sit on top of it once it’s glued down.
Use your high-temp hot glue gun to adhere each letter to the sign. Then, once you’re done, hang and enjoy! One thing I like about the sign I bought from Hobby Lobby, is that it came with the attached rope for easy hanging. I already had a Hercules hook installed in the spot where I wanted to put this sign, and the hook worked perfectly for the rope.

Ideas to Customize Your Creative Sign!
Of course, you don’t have to do it the same as I did. In fact, I encourage you to make your sign unique to you! In addition to “be CREATIVE” (Carissa’s sign), or “CALLED TO create” (my sign), here are some ideas to consider:
- Called to Teach
- Called to Love
- Called to be a Leader
- Created for a Purpose
- Living on Mission
- Made with a Purpose
- Made to Thrive (a reference to this Casting Crowns song)
Happy creating! 🙂

Hi! Thank you so much for visiting Divine Creative Love. I’m a Jesus-lovin’ girl, artist, designer, and general creative-at-heart. And, I have narcolepsy. I blog about faith in God, overcoming challenges, and creative topics such as Bible journaling. If you’re new here, be sure and subscribe to my list so you won’t miss anything!