
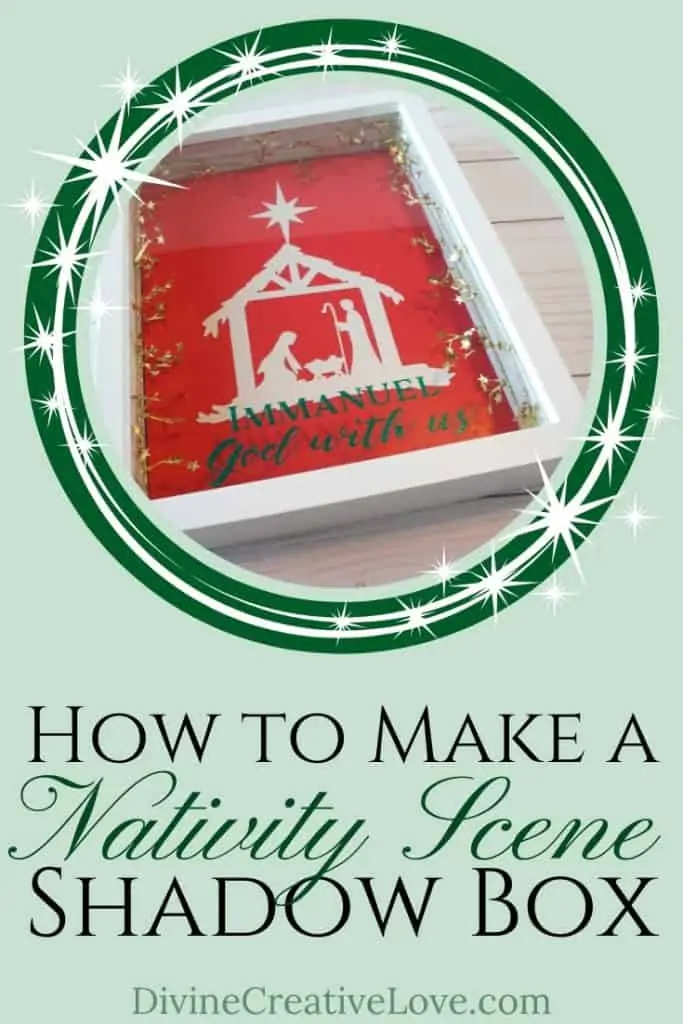
Let’s celebrate the true meaning of Christmas, with this DIY nativity shadow box project! All you need is a shadow box, a nativity image, and some colorful paper and other items to decorate it with.
{ This post and the photos within it contain affiliate links. If you make a purchase after clicking an affiliate link, my ministry gets a small commission, with no extra cost to you. See my full disclosures HERE. }
Y’all, it’s only October, but I’ve already been bitten by the Christmas bug, so to speak!
Usually it takes me a lot longer to get into the celebrating-the-birth-of-Jesus spirit… like, two weeks before Christmas and I’m finally getting there.
But, I just heard this wonderful new song from For KING & COUNTRY: For God is With Us. And even though it’s technically not a Christmas song, it IS all about celebrating how the birth of Jesus changes everything. It’s the awe and wonder and worship of a loving God, who came down to our level, to save us from our sins. So awesome!
So anyway, that song was my inspiration in creating this new nativity scene shadow box, with “Immanuel – God with us” displayed on the glass. (FUN FACT: in creating this box, I researched the difference in spelling ‘Immanuel’ vs. ‘Emmanuel’… turns out, one is translated from the Old Testament (from Hebrew), and the other is from the New Testament (from Greek). Both mean the same: God with us!)
Whichever way you spell it, this Christmas shadow box is a celebration of the gift of Jesus Christ: GOD WITH US. ❤️
How do you make a nativity shadow box?
The easiest way to make a nativity scene shadow box, is with a handy nativity silhouette svg file. I bought this fantastic ‘Big Nativity Bundle’ on Design Bundles, which contains several pre-built nativity scenes, plus a ‘nativity scene builder’ (all the individual characters and backdrops for you to create your own nativity silhouette).

I got the nativity bundle several months ago, with the intention of using it to make Christmas shirts (which I’m still going to do!). It just worked perfectly for making this nativity shadow box!
With this cool ‘nativity scene builder’, and a cutting machine like a Silhouette Cameo, you can come up with all kinds of nativity craft ideas to make! Not just DIY shadow box ideas, but also wooden Christmas signs, wreaths, or even a nativity garden flag.
(If you don’t have a Silhouette, Cricut, or other craft cutter, not to worry! You can always print your nativity instead of doing a cutout, or look for a pre-made nativity scene at your local Hobby Lobby).
Make Your Own DIY Nativity Scene Shadow Box
Basically, all you need to make this nativity shadow box, are the nativity files, some festive paper, and some goodies to decorate the box with. I’m sure there are tons of Christmas shadow box ideas you could come up with! That being said, these are the specific items I used in mine…

SUPPLIES:
- 8×10 shadow box (mine is 2” deep, from Hobby Lobby)
- Big Nativity Bundle (this is where I got the nativity scene image—these files are great for cutting and/or printing)
- Red cardstock paper (for background); iridescent white cardstock (for the nativity)
- Silhouette Cameo or other cutting machine (I used my Cameo 3 to cut the nativity scene, but you could just print yours on some colored paper instead of cutting)
- Gold star garland (I got mine at Hobby Lobby)
- Hot glue gun (to secure the paper and garland in the box)
- Expressions adhesive glitter vinyl in ‘emerald envy’ (I cut the “Immanuel – God with us” out of this vinyl; for an easier alternative, you could buy a decal or dimensional sticker at your local craft store)

STEP-BY-STEP INSTRUCTIONS:
Before you get started, I recommend cleaning the glass on your nativity scene shadow box. Since I knew I would be applying adhesive vinyl on the glass, I took the glass out and washed it with soap and water and dried it with a lint-free towel, to make sure it was absolutely as dust- and debris-free as possible. (Just be careful when handling the glass, as the edges can be sharp!)
STEP 1: Trim your background paper to fit the back of the shadow box. Mine ended up being about 7.5” wide and 9.5” tall to fit my 8”x10” box.

STEP 2: Cut or print your nativity scene image. I used my Silhouette Cameo to cut the nativity out of iridescent white paper. (If you’re new to craft cutting, the Silhouette School blog has this great beginner introduction to cutting cardstock). But if you don’t have a cutting machine, you can print the nativity directly onto your colored background paper.
STEP 3: Attach the nativity to the background. I used 1/8” adhesive tape from Scrapbook.com, which is just what I had on hand. But adhesive spray or even stick glue would also work for this step.

STEP 4: Attach the background paper to your Christmas shadow box backing with hot glue. Just a dab on each corner, and one or two dabs in the middle is plenty good enough to hold the paper in place.

STEP 5: This might be the trickiest part of making this nativity shadow box! Take your star garland (or other embellishment like ribbon or even faux flowers), and attach it to the inside of the box. I wanted to wrap the star garland all the way up the inside of the box, from the bottom left corner, to the top, and then back down to the bottom right corner.
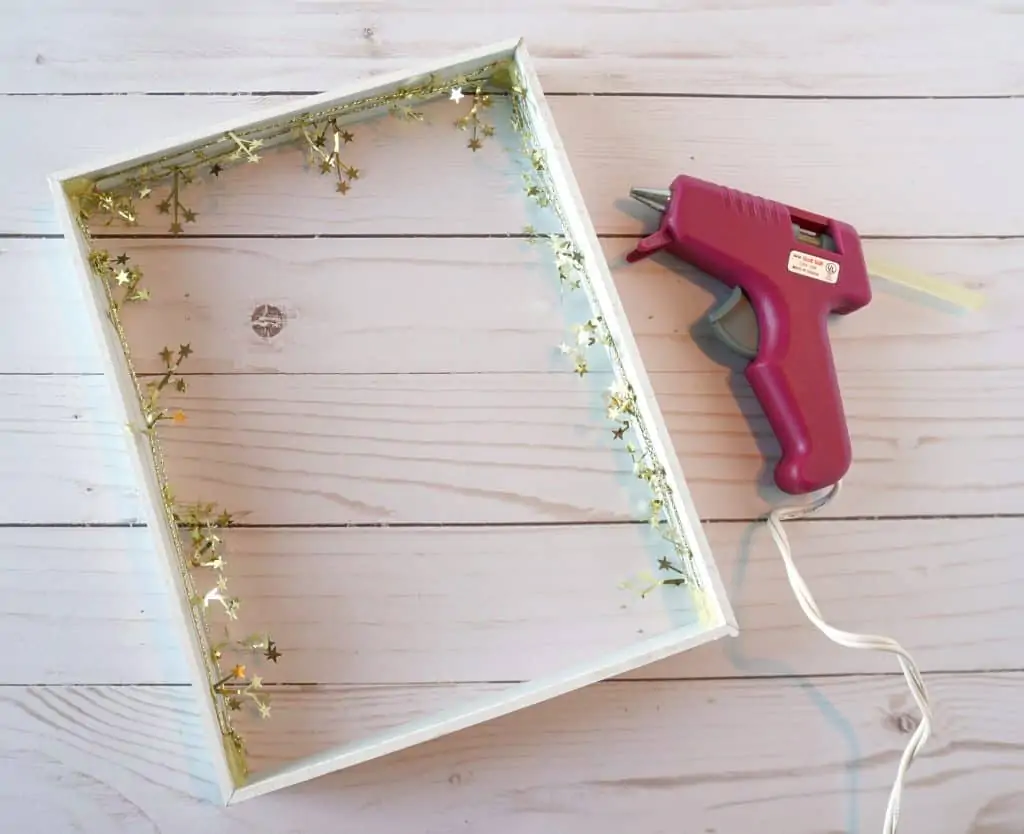
To accomplish that, I removed the inner part of the box (the part the holds the glass in place), and used my hot glue gun to attach the garland to the inside corners. I did this twice, with two different strands of garland: one closer to the front of the box, and another closer to the back. It took a bit of effort to hold the garland in just the right spot, wait a minute for the hot glue to cool/solidify, and then move onto the next corner. But, I got it done! And it looks just as fantastic as I’d imagined it. If you look closely, you CAN see the blobs of hot glue holding the garland in place, but it’s really not that noticeable.
STEP 6: Attach your desired embellishment on the glass! I used my Silhouette Cameo to cut the words “Immanuel – God with us” out of adhesive vinyl (glitter ‘emerald envy’ from Expressions Vinyl). But, if you don’t have a cutting machine/don’t want to mess with vinyl, you can find dimensional stickers or decals at Hobby Lobby to use on the glass of your nativity shadow box.

HOT TIP: If you’re new to adhesive vinyl and want to use some on your nativity scene shadow box, check out this Expressions Vinyl article which talks about the basics of adhesive vinyl. Expressions Vinyl also has a great Facebook group, where you can get additional project help and inspiration!
“The virgin will conceive and give birth to a son, and they will call him Immanuel” (which means “God with us”).
Matthew 1:23 (NIV)

How will you give honor and praise to our Lord Jesus this Christmas? There are so many ways for how to make a Christmas shadow box, different words or Bible verses you could use, and other parts of Jesus’ birth story that you could highlight. Let your nativity scene shadow box be completely unique!
→But beyond any Christ-centered Christmas décor you make, remember that the best way to honor Christ at any time of year, is simply to love others, to serve and give generously, and point people to HIM. ❤️

Hi! Thank you so much for visiting Divine Creative Love. I’m a Jesus-lovin’ girl, artist, designer, and general creative-at-heart. And, I have narcolepsy. I blog about faith in God, overcoming challenges, and creative topics such as Bible journaling. If you’re new here, be sure and subscribe to my list so you won’t miss anything!