
This is the before-and-after story of my craft desk makeover. From mega messy desk, to a haven for Bible journaling and crafting, I hope this transformation inspires you to tackle your own office, craft space, or other messy spot that’s driving you bananas!

{ This post and the photos within it contain affiliate links. If you make a purchase after clicking an affiliate link, my ministry gets a small commission, with no extra cost to you. See my full disclosures HERE. }
I didn’t think I would ever have such a nice craft space, y’all.
I used to see the photos on Pinterest, of people who had super-beautiful and ultra-organized craft rooms. I’d visit the articles to get tips on craft supply organizing, and I’d think ‘that’s wonderful, but I don’t think that’s possible for me’.
Maybe it’s because I don’t actually have a craft room…just a built-in desk nook in a corner of my bedroom. I’ve always referred to it as my “craft desk”, but in reality, it was a mish-mash of craft stuff with a lot of other random stuff. I don’t think I really gave it any respect…I just let it all hang out, for the most part. Sure, there were some things organized, but overall it was just one big mess.
The worst part is, I only had a teeny little piece of desk real estate to actually craft on…and my supplies were a pain to use, with stuff buried under other stuff, and I was constantly lifting up items to look for things, like ‘Where did I put that bottle of paint? It was right here a minute ago!’. I’m telling you, it was BAD.
That is, until I felt God nudging me to make Bible journaling video tutorials.
I’d been thinking about re-organizing the desk prior to that… but here was the push I needed to do it. Because to do videos, I’d have to actually have a space cleared for my Bible, and be able to easily reach the supplies I would use, without knocking things over or digging for them.
And one day, I just couldn’t take it anymore! I decided to dive in head-first, and get it done. Here, I’ll show you the before and after, and some of the techniques and products I used to get organized (not to mention lessons learned!)… I hope this inspires you to tackle your own organizing challenges!
My Craft Desk: The Before
Brace yourself, my friend. It was SO BAD. When I took these ‘before’ photos, I left everything intact. All the random paper scraps, piles, and junk, in all it’s ugliness. Honestly, I didn’t really own up to how bad it had gotten, until I started working on it.

I recruited Kate Martin, a professional organizer, to do some virtual organizing sessions with me, to help me sort through all the stuff (because at the beginning, I really didn’t know where to start!).
And the further along I got, the more I realized how BAD it really was.
A few lessons I learned in this process:
- Accessibility is key! Kate suggested that since I’m right-handed, I should put my most-used items in the right-hand drawers/right side of the desk. (It seems obvious, but I was clearly not doing that at all before!)
- Put like with like. Yes, I’ve heard this one many times, and you probably have too. But, it’s one thing to know that’s what we should do, and another to actually do it. I’m so grateful for Kate’s guidance in helping me sort the myriad of craft supplies into manageable categories!
- Relocate items that don’t belong. This was a big lesson for me. I’ve referred to this desk as my “craft desk” for years, but actually there was a lot of stuff in there that wasn’t for crafting at all! And, stuff that I hadn’t used in years too! I had a whole drawer full of spiral notebooks, another drawer half-full of duct tape, and piles of stuff I’d completely ignored for years. For example, I haven’t oil-painted in ten years, but some of my oil painting supplies still took up residence on my desk (those are now in my closet instead).
- It’s gonna get messier, before it gets better! There was a period of two or three weeks when it felt like my whole bedroom was a craft-supply-sorting bin. I had to get through the mess, before I could start organizing and putting things in their newly designated homes.
In the end, I got rid of nearly all the ‘organizing’ solutions I had previously used. Gone are the cumbersome rotating supply organizer (the big white hexagon on the left side of the desk), letter trays, bins, and the jam-packed pocket organizer that hung on the wall on the right side.

No more storing washi tape and ink pads on the floor, either. Instead, here’s what I did…
The Craft Desk Makeover: After!
I can’t wait to show you all the great organizational tools I discovered along this journey! I really did snag some cool items, and thank the Lord, there is a happy ending to this messy desk saga.
SIDE NOTE: I also strived to get some better lighting in these ‘after’ photos. My desk is tucked in a corner, on the opposite side of the room from the window, so it’s still not ideal, but better than before anyway…

The Storage Solutions
From left-to-right…
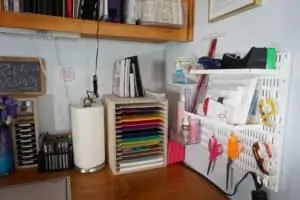
Elfa Utility Boards: These utility boards from The Container Store are amazing! It took a bit of work to install, but once in place, it was so easy to mix and match hooks and bins to achieve what I wanted. I put one board on the left wall, and one on the right, and tricked them out with frequently used items that I wanted to be easily accessible (like scissors and tape).
Cord Management: To conceal the surge protector + cords that power my computer (which is off camera to the left), I used this cord management box and this velcro cord wrap. I also attached a clear command hook to the wall, to hold up the cords so they don’t impede my desk drawer from opening and closing.
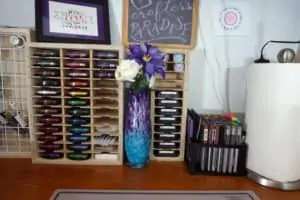
I feel, like, SO SNEAKY y’all. The surge protector cord now snakes behind the paint and ink pad organizers, to plug into the wall in-between the two ink pad organizers. And that beautiful blue-and-purple vase + faux flowers you see? It conceals the outlet! Not to mention, my new paper towel holder conveniently blocks the view of another wall outlet. Look ma, no cords! Okay, so there are still a few, but it’s so much better than it was!

My journaling Bibles now have a prominent place on the left side of my desk. I love that they’re right there ready whenever I want to read or do some journaling.
Paint Organizer: To store my paint bottles in an easily accessible fashion, I purchased this awesome wood and wire grid organizer from Hofcraft on Etsy. It fits 81 2oz. paint bottles, so I have room to grow!
Stamp’n’Storage: The two ink pad organizers in the center, and also the paper organizer on the right side of the desk, are from StampnStorage.com. From L-R: I have the 36-slot slim ink pad holder (with my ColorBox ink pads), the 12-slot Distress ink pad holder, and on the far right, the 8.5″x11″ paper holder (15-slot). They’re super solid, can be mounted on a wall if desired, and they came fully assembled and ready-to-use. And I even had a few ink pad slots to spare!
Perched on top of the 36-slot ink pad organizer, I have one of my hand-lettered pieces that I framed. It’s a reference to my favorite song “Reason” by Unspoken…and a phrase which has become sort of an anthem for me: “His Love is the Reason”.
Marker Organizer: To hold my brush calligraphy markers, I bought this 96-slot organizer from Amazon (it’s to the left of the paper towel roll).
Paper Towel Holder: This nifty holder from The Container Store is a one-handed deal…meaning, no more reaching for the roll with one hand, and using the other to rip off a paper towel. With this, it’s easy to rip it off with just one hand.
Craft Mat: And in the center of the desk, I have this Fiskars silicone craft mat to protect my desk from obtaining any more permanent paint spots (than it already has acquired over the years, ha!). Seriously though, I was so done with using sheets of notebook paper to protect the desk. This way is much better!
Drawers: My desk drawers made quite a transformation too! No more being stuffed full of random items like notebooks and sheet protectors that really belonged elsewhere…now they’re actually full of craft supplies. In particular, my top right-hand drawers contain essential Bible journaling supplies. And, my left-hand drawers are mostly painting supplies like watercolor tubes and containers for mixing paint in. I used my favorite Linus shallow drawer organizers from The Container Store, to organize everything.


Extra Special Finds
I saved these items for last, because they’re just so adorable and handy, not to mention unique… I was so thrilled to discover them, and even more thrilled to actually use them.
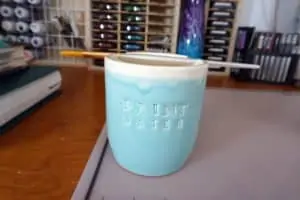
Paint Water Cup: This adorable handmade paint water cup is from JeanetteZeis’ Etsy shop. It has a sweet spot for a brush to sit, and it’s just too cute. I will never use plastic disposable cups for paint water again!

Rotating Tool Organizer: This nifty gadget from the CraftInnovations Etsy shop, is actually a rotating organizer! CraftInnovations has many different organizers with different cup sizes, too. Mine is actually one of the smallest ones (only about 6″ wide), but they make some that are huge! Some of their organizers could conceivably hold an entire collection of pencils, crayons, brushes, and so forth. Also, they give you a choice of pre-assembled (with the cups and base remaining unfinished), or if you wish to paint or stain yours (as I did with mine), you can choose the unassembled option. The latter enables you to paint or stain the cups and base, and then follow the assembly instructions to put it all together. (I painted mine with a gold base + white-washed cups + I made the cup rims each a different color, to match the Called to Create sign that hangs on the left side of my desk).
Final Touches
After I finished the actual desk, I spent several more Saturdays re-organizing my bookshelf, to make space for my marker organizers, washi tape box, clear stamp bin, and light pad. I love that I can just keep the light pad plugged in, so it’s out of the way, but still ready to go when I need it (usually for tracing a design into my journaling Bible, or for hand-lettering).


And finally, there’s this list of important ‘principles’ and Bible verses I want to remember, which got a new home on the left side of the desk. These Bible verses help me stay focused on my purpose, and I know on those inevitable down days when I wonder “what am I here for?”, I can look at it and be reminded. The very last thing that I did, to polish off my craft desk transformation, was to make this purple and gold cross garland to hang above the framed Bible verses. I used the hooks that were already there, where the old pocket organizer used to be.
You know, as I was writing this post, I thanked God for this amazing craft desk transformation. And then, I thought about how thankful I am that He transforms ME from the inside out! Every day, God changes me for the better.
I think dealing with life’s messes, cleaning, organizing, and so forth, can be a great metaphor for how we should pay attention to the condition of our hearts and our relationship with God. We shouldn’t let the cobwebs in our souls (a.k.a. unrepented sin, anger, bitterness, etc.) gather up and create a huge mess before we finally deal with them…instead, it’s good to pray every day, asking God to show us what areas need improvement, and for His help in purifying our hearts (see Psalm 51).
What organizing challenge in your life will YOU tackle? I hope this post leaves you inspired, that even if you have a mess on your hands, it’s possible to turn it around. And if you feel like you’re the mess (as I often do about myself!)? God can take your mess, and turn it into His masterpiece.
And I am certain that God, who began the good work within you, will continue his work until it is finally finished on the day when Christ Jesus returns.
Philippians 1:6 (NLT)

Hi! Thank you so much for visiting Divine Creative Love. I’m a Jesus-lovin’ girl, artist, designer, and general creative-at-heart. And, I have narcolepsy. I blog about faith in God, overcoming challenges, and creative topics such as Bible journaling. If you’re new here, be sure and subscribe to my list so you won’t miss anything!