
I just love making homemade cards, y’all! In this post, I’m showing you how to make an Easter card, step by step. Then, you can use that card to bless someone in your life with the joyful message of Christ’s love!
{ This post and the photos within it contain affiliate links. If you make a purchase after clicking an affiliate link, my ministry gets a small commission, with no extra cost to you. See my full disclosures HERE. }
Ever since I re-organized my craft supplies last year, and cleared ample space on my desk for crafting, I’ve been getting more into card making.
I mean, I had some card-making supplies before, but I didn’t really use them much. But now, I’m really getting into it! I even made sweet little Valentine cards for my co-workers! So fun!
And since I’ve been getting more into making homemade cards, I’ve been wanting to start sharing tutorials with you. So, here you go! The first tutorial: how to make your own Easter cards.
I’m going to give you some great Christian Easter card ideas, to bless your neighbors with God’s love. And really, the steps I took to make this card can be replicated for lots of different kinds of homemade cards…you’re only limit is your imagination!

But before I get into how to make an Easter card, there is one thing I want to say…
Most homemade Easter cards are adorned with colorful eggs and sweet bunnies, which is totally cute… but that’s not what Easter is truly about! I chose to make this card with a cross as the centerpiece, because there is no greater love than this: Jesus Christ gave His life for us! He paid the price for our sins, so we could be forgiven and have eternal life.
Praise be to the God and Father of our Lord Jesus Christ! In his great mercy he has given us new birth into a living hope through the resurrection of Jesus Christ from the dead.
1 Peter 1:3 (NIV)
So, although eggs and bunnies are adorable, there is no better message for an Easter card than that of Jesus’ love and sacrifice for us. Do YOU know the freedom, joy, and peace of having your sins forgiven, and of calling Jesus your Lord and Savior?
How to Make an Easter Card Step by Step
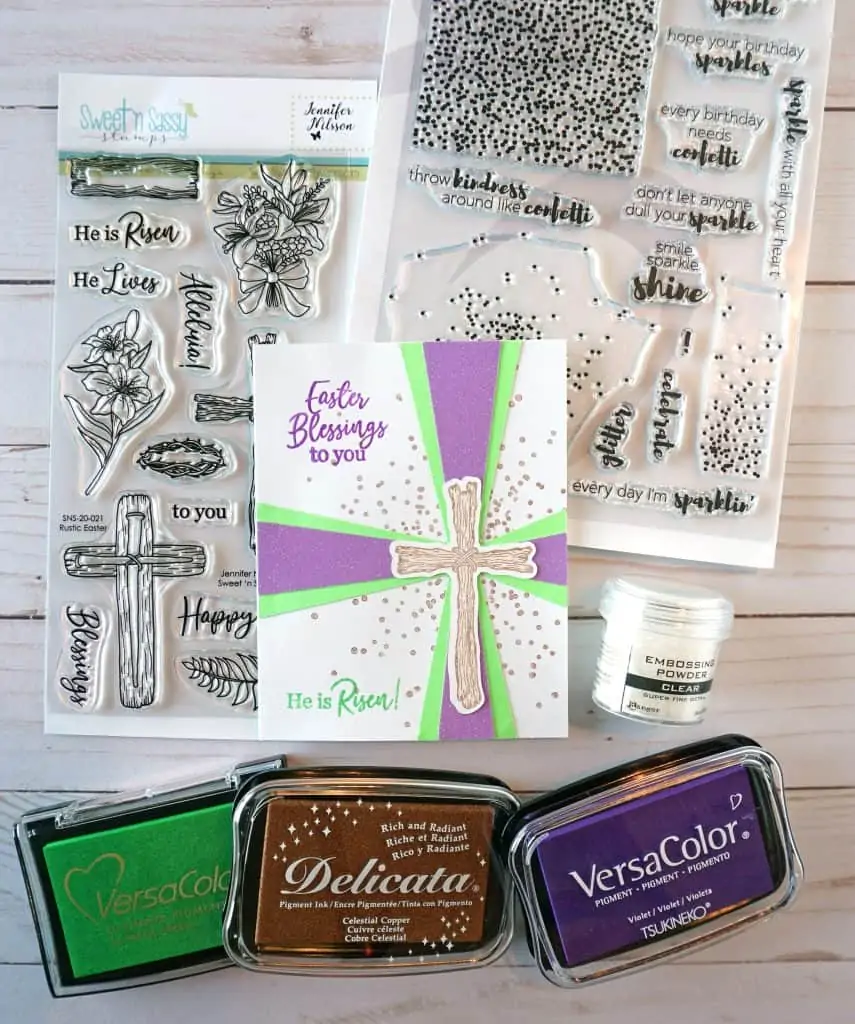
Now, about this lovely Christian Easter card…a fantastic way to make any homemade card, is to begin with a great stamp set! And there are lots of fantastic Easter stamps out there. The one I’m using for this card is the ‘Rustic Easter’ set from Creative Worship Stamps. I ordered it sometime after Easter last year, so I’m excited that I get to use it now that it’s almost Easter again!
Before you get started, it’s always a good idea to create a sketch of your layout, and play around with the supplies you have on hand. See which things look good together, how they fit together on the card, and where you might want to position the different elements. That way, you can brainstorm some great homemade Easter card ideas, and then pick the one you want to run with.

For this religious handmade Easter card, I decided on a color scheme of purple (signifying royalty, that Jesus is the King of Kings), and green (to symbolize the new life we have in Christ). Once I selected the papers and decided on a plan, I used my Silhouette Cameo to cut out the pieces: one green, one purple glitter, and the white cross on top.
[ NOTE: You can totally cut these pieces by hand with scissors; I just used my Silhouette machine because I’ve been telling myself I need to make better use of it! And, it is pretty handy. If you have a Cameo, and want to give this a try, check out this Silhouette School tutorial on how to make cut files from stamps. ]

SUPPLIES USED:
- A2 white card base (I got mine from JoAnn Crafts, but you can easily find them at Hobby Lobby or Michaels as well)
- Light green cardstock + purple glitter cardstock + white cardstock
- Double-sided adhesive
- Creative Worship Stamps ‘Rustic Easter’ stamp set
- Altenew ‘Kind Confetti’ stamp set
- Acrylic stamp blocks
- Delicata ink pad in ‘celestial copper’
- VersaColor pigment ink pad in ‘light green’
- VersaColor pigment ink pad in ‘violet’
- Prismacolor Premier colored pencils (‘beige’ and ‘20% French gray’)
- Ranger clear embossing powder (super fine)
1) Create the backdrop
Okay, now…the first step in how to make an Easter card, is to start with your backdrop. In this case, I decided the card needed a little something more than just the green and purple paper… so, I grabbed a stamp from this handy Altenew ‘kind confetti’ set, and stamped copper confetti all around where the cross would go. To do this, you just rotate the stamp, so it looks like the confetti is radiating out from the cross. Feel free to only ink parts of the stamp, to fill in confetti dots wherever you think they should go.


2) Create your centerpiece (the CROSS)
An essential part of how to make an Easter card, is to have a fantastic centerpiece, or “focus area” on your card. For this step, I used one of the crosses from the Creative Worship Stamps ‘Rustic Easter’ set, and stamped it with Delicata ‘celestial copper’ ink. I actually cut the cross shape on my Silhouette Cameo 3 beforehand… but, you can totally stamp the cross on a piece of cardstock, and then cut it out by hand.

3) Add colorful layers
Once you have the background and cross stamped, you can add colorful papers or embellishments! In my experience thus far with making homemade cards, this is what really elevates a card from just so-so to really fantastic. Whether you cover up the white of your card completely, or let parts of the white show through, adding those layers makes it look extra special.
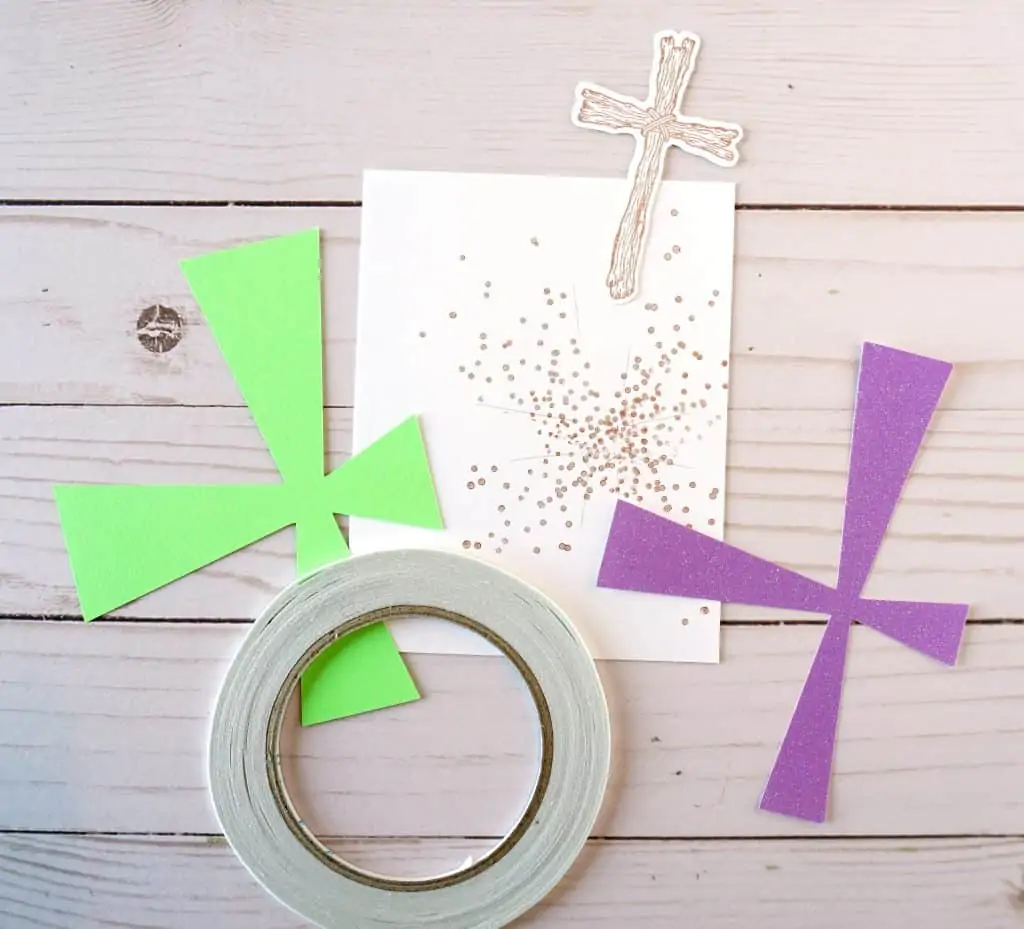
For this Easter card, I put a green layer down first, followed by a purple glitter layer, and then the cross on top. And, that left parts of the white card still available for stamping on (see step 5).
A note about adhesive: The double-sided adhesive I’m currently using is a Scrapbook.com 1/8” adhesive roll, which is SUPER STICKY. It works great for adhering things to the card, but it’s SO sticky, it’s kind of a pain to work with. Whenever I run out of it, I’ll probably try something else, but for now this is what I’m using.

You can see here, how I placed the strips of adhesive tape as close to the edges as possible, and then filled in some on the inside too. That way, you won’t have a problem with the edges of the cardstock coming up from the card.
4) OPTIONAL: Add color to the interior of the cross
One thing I decided to do at the point, was to add a bit more color to the inside of the cross. I took a few of my Prismacolor Premier pencils, and colored it in lightly. I chose the ‘20% French gray color’ for the rope at the center of the cross, and ‘beige’ for the wood part of the cross. Those colors are light enough that they didn’t take away from the ‘celestial copper’ ink, but they still added a bit more dimension and made the cross stand out more.

5) Stamp your greetings (+ emboss if desired)
Lastly, add the greetings/message to your card as desired. There are endless Easter greeting card ideas you could do, depending on the message you want to convey. I chose to have this one say “Easter Blessings to you” at the top, and “He is risen!” at the bottom, using stamps from the aforementioned ‘Rustic Easter’ stamp set.
I used a violet pigment ink pad for the “Easter Blessings…” and a light green pigment ink pad for the “He is risen!”. Also, I decided to take the extra step of embossing the words, to give them a glossier look. And in the end, it really does look good with the shiny purple glitter paper; they both have a glossy sheen to them.

[ A NOTE ABOUT EMBOSSING: It’s actually a lot easier than you might think! For years, I avoided getting into embossing, because I thought you had to have special embossing ink, plus embossing powders in all different colors. But it turns out, it’s possible to purchase just one clear embossing powder, and use that with whatever color inks you already have. The only requirement, is for the ink to stay wet for long enough for the embossing powder to adhere to it. Dye inks or other quick-drying inks wouldn’t work; but pigment ink works great, as it takes a while to dry. As for the heat necessary to melt the embossing powder, I discovered that the craft heat tool I already had worked just fine…no need to buy a specialized embossing heat gun. ]

Now that you know how to make an Easter card, only one question remains: Who will you bless with your homemade card creations? Certainly, one of the best things about card making, is the opportunity to make someone feel loved and cared for. So go ahead, make somebody’s day!

Hi! Thank you so much for visiting Divine Creative Love. I’m a Jesus-lovin’ girl, artist, designer, and general creative-at-heart. And, I have narcolepsy. I blog about faith in God, overcoming challenges, and creative topics such as Bible journaling. If you’re new here, be sure and subscribe to my list so you won’t miss anything!